
How to Choose Foaming Paste for Screen Printing in 2026?

Choosing Foaming Paste For Screen Printing in 2026 requires more than comparing prices or reading product labels. The right paste must create a stable, raised surface without blocking the screen, cracking after curing, or losing softness during washing. A printed sample may look excellent under workshop lighting, yet feel harsh after heat exposure. That difference matters.

Start by matching the paste with the fabric, mesh count, stencil thickness, and curing equipment. Cotton, polyester, and blended fabrics can react differently to expansion. A paste designed for low-temperature curing may fail in a high-speed production line. Check the technical data sheet carefully. Review viscosity, recommended deposit thickness, activation temperature, storage life, and washing performance. Ask the supplier for recent test results and a physical sample.

Small tests reveal practical problems. Print a simple logo, cure it, then bend, stretch, and wash the fabric. Watch the foam height near sharp corners. Look for pinholes, uneven expansion, or a sticky surface. These details often matter more than impressive catalog photographs. In one trial, the highest expansion rate looked attractive but reduced print definition. It was not the best choice.

Reliable selection also depends on supplier support. A knowledgeable supplier should explain screen preparation, curing limits, and compatibility concerns without vague promises. Keep production records, including room temperature and drying time. Results can change between seasons. There is no perfect formula. Your first choice may need adjustment after real testing, but careful comparison reduces waste and protects the final garment quality.
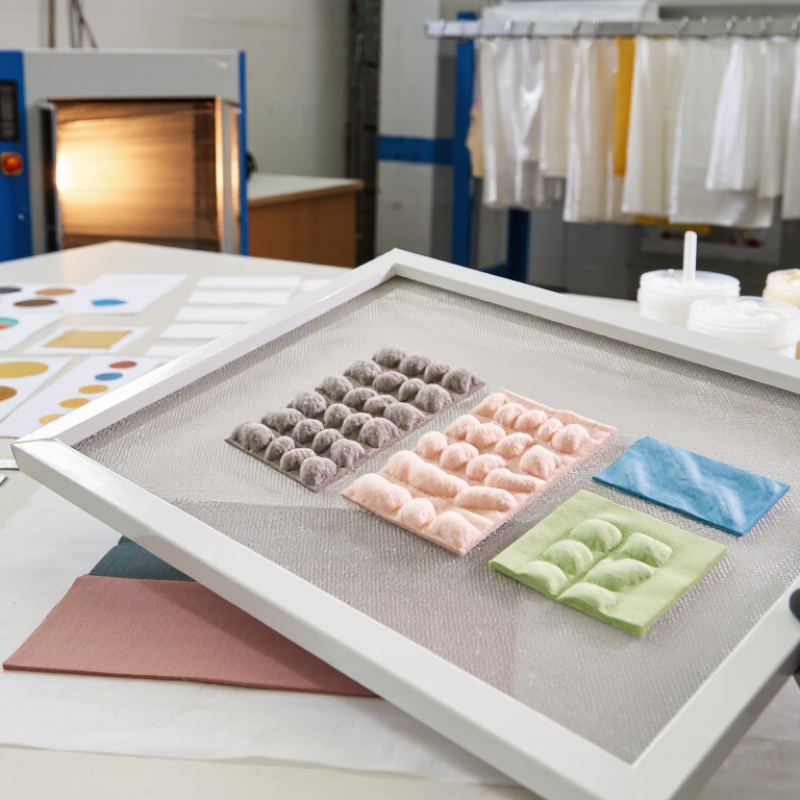
How to Choose Foaming Paste for Screen Printing in 2026?

What Foaming Paste Is and How It Works in Screen Printing

How to Choose Foaming Paste for Screen Printing in 2026?

Foaming paste is a screen-printing medium that creates a raised, soft texture after heating. It usually contains a binder, pigment, and a heat-activated foaming agent. During curing, the agent releases gas and expands the printed layer. The result can resemble fine foam, a cushion, or a controlled three-dimensional surface.

The final effect depends on more than the paste itself. Mesh count, stencil thickness, squeegee pressure, print passes, and curing conditions all matter. A thicker deposit normally produces higher relief, but excessive heat can flatten details or weaken the fabric’s hand. I have found that small test prints reveal problems faster than technical assumptions. A paste may look excellent before curing, yet crack after washing. That mistake is easy to make.

Tips: Start with a small fabric swatch. Record mesh count, ink volume, drying temperature, and curing time. Check the print after twenty-four hours. Rub it, stretch it, and wash it according to the garment’s care method. Watch for pinholes, uneven expansion, hard edges, or color changes. Choose a paste that matches the fabric, desired height, and production speed. Low-odor or restricted-substance options may support better workplace practices, but supplier documentation still needs careful review. Avoid chasing maximum puff. Controlled texture often prints more reliably.

Which Fabric Types and Printing Effects Require Foaming Paste

How to Choose Foaming Paste for Screen Printing in 2026?

Foaming paste works best when the fabric can support a raised surface. Cotton jersey, fleece, canvas, and medium-weight cotton blends are strong candidates. Their fibers hold the expanded paste without losing too much height after washing. Brushed fleece can create a soft, cloud-like effect. Canvas produces a firmer, more embossed finish. Denim also works, but its dense weave may require careful paste penetration.

Stretch fabrics need more caution. Lightweight polyester, elastane blends, and rib knits can distort during curing. Excessive foam may crack when the garment bends. On these materials, use a lower expansion level and print thinner layers. Always test after washing. A sample that looks excellent on the press may flatten, stiffen, or peel later.

Foaming paste suits raised lettering, puff logos, tactile graphics, and tone-on-tone textures. It can highlight small areas, such as sleeve marks or chest details, without covering the whole garment. Mesh count, squeegee pressure, drying temperature, and curing time all affect the final height. A common workshop mistake is chasing maximum volume. More foam is not always better. I would rather accept a slightly lower profile than a brittle surface with poor recovery. Small test squares reveal these problems early.

How to Choose Foaming Paste for Screen Printing in 2026?

Fabric suitability depends on fiber structure, heat tolerance, stretch, and the required surface effect. The scores below are practical selection ratings from 1 to 5, where 5 indicates a stronger starting suitability for foaming-paste printing.

How to read the chart: Cotton usually offers the most predictable result for raised and three-dimensional prints. Cotton-polyester blends can also work well, but curing and adhesion should be tested. Polyester and nylon require careful paste selection and process testing because synthetic fibers may be heat-sensitive, dye-migration-prone, or less receptive to water-based formulations.

Foaming paste is most useful for: raised lettering, embossed logos, puff effects, high-density graphics, textured panels, and dimensional highlights. It is generally unnecessary when a flat, soft-hand, or highly elastic print is required.

How to Compare Foaming Paste Formulas and Performance

Choosing foaming paste in 2026 requires more than comparing catalog claims.

Compare formulas under identical screen conditions: mesh count, squeegee pressure, print deposit, and curing temperature. A practical test starts with expansion ratio, wet density, viscosity, and foam-cell size. Smaller, even cells usually create a smoother raised surface. Large cells may feel soft, but they can collapse during washing.

Textile Exchange’s Materials Market Report 2024 recorded global fiber production at about 124 million tonnes in 2023, with continued growth expected by 2030. This pressure makes durability and material efficiency important. A formula using less paste per garment can reduce waste, but only if coverage remains stable.

Measure cured height after 24 hours, then repeat after laundering under AATCC 61 conditions. Record cracking, flattening, color change, and hand feel. Do not trust touch alone.

Look closely at processing behavior. A paste that foams quickly may also lose stability during storage or screen stoppages. Test it after controlled shear, overnight rest, and repeated printing. Check the technical data sheet for solids content, curing window, recommended deposit, and storage life.

Independent abrasion testing, such as ASTM D4966, adds useful evidence. My own preference is a balanced formula, not the tallest foam. That judgment can be wrong. A softer substrate or different fabric blend may change the result completely.

Always test the finished garment.

How to Test Foaming Paste Before Full-Scale Production

How to Choose Foaming Paste for Screen Printing in 2026?

Before full-scale production, test foaming paste on the exact fabric, mesh, and curing equipment you will use. A paste may expand beautifully on cotton but flatten on blended fabric. Prepare small test panels with different paste ratios and print thicknesses. Record mesh count, squeegee pressure, drying time, and curing temperature. Small details matter.

Check the print after curing. Measure its height, softness, surface coverage, and edge definition. Rub the design firmly, then wash it several times under normal conditions. Look for cracking, color loss, shrinking, or poor adhesion. A perfect-looking print can still fail after washing.

In production trials, uneven heat often causes inconsistent foam, even when the formula is correct. That part is easy to underestimate.

Tips: Let each sample rest for 24 hours before judging it. Test both thin and heavy deposits. Use a simple ruler or thickness gauge for comparison. Keep one untreated fabric sample nearby. If results vary, repeat the test before changing the paste. A rushed decision can create expensive rework. Also, do not copy another printer’s curing settings without verification; your dryer, fabric, and print thickness may behave differently.

How to Store, Handle, and Use Foaming Paste Safely

When choosing foaming paste for screen printing in 2026, safe handling should guide the decision. I prefer products with clear technical sheets, batch numbers, storage limits, and curing instructions. These details show whether the supplier understands real production conditions. Check the recommended temperature range before ordering. A hot workshop can damage paste quality, even when the container looks normal.

Keep it sealed. Store the paste in a cool, dry cabinet away from sunlight, heaters, and food areas. Avoid freezing it. Mark the opening date on every container, then use older stock first. Before printing, wear suitable gloves, eye protection, and work clothing. Maintain ventilation, especially during drying or heat curing. Do not guess.

Stir slowly with clean equipment. Fast mixing can introduce air and change the paste texture. Never return unused paste to the original container after contact with fabric or ink. Test a small print on the actual fabric, then check expansion, softness, adhesion, and wash resistance after curing. I still make one mistake sometimes: judging the surface before it has fully cooled. That can hide poor curing. Follow the product’s safety data and technical guidance, and keep incompatible materials apart. Clean spills promptly using the approved method, not a random solvent. Record temperature, curing time, and screen settings for repeatable results.

How to Choose Foaming Paste for Screen Printing in 2026? - How to Store, Handle, and Use Foaming Paste Safely
Selection or Safety Dimension Practical Specification or Typical Range Why It Matters in Screen Printing Recommended Practice Risk Indicator
Foam Activation Temperature Commonly approximately 120–180°C, but the exact activation window depends on the formulation. The paste must expand during curing without damaging the fabric, mesh, adhesive, or surrounding print layers. Confirm the activation and curing profile in the current technical data sheet. Test on the actual substrate before production. Check Product Data
Substrate Compatibility Cotton, polyester, blends, coated textiles, and other substrates may respond differently to heat and expansion. Fiber type, fabric construction, dye migration, and coating can change adhesion, softness, color, and foam height. Run a wash, stretch, abrasion, and heat test using the intended fabric lot. Test Required
Screen Mesh and Stencil Use a mesh and stencil thickness suitable for depositing a controlled, relatively heavy film. Insufficient deposit can produce weak or uneven relief; excessive deposit can cause poor curing, cracking, or loss of detail. Optimize mesh count, stencil thickness, squeegee pressure, and print strokes together rather than changing only one variable. Process Control
Viscosity and Mixing Use the viscosity specified by the supplier. Avoid adding solvent, water, or other modifiers unless explicitly permitted. Unapproved dilution can reduce expansion, alter adhesion, create pinholes, or affect curing and storage stability. Mix gently and uniformly with clean tools. Avoid whipping air into the paste and record any approved adjustment. Avoid Unapproved Additives
Storage Temperature A cool, dry, well-ventilated area is generally preferred; many water-based products are protected from freezing and excessive heat. Freezing, overheating, and repeated temperature cycling may cause separation, thickening, skin formation, or irreversible performance loss. Follow the product label and safety data sheet. Keep containers closed and away from direct sunlight, heaters, and steam lines. Protect From Extremes
Container Management Keep the material in its original, correctly labeled container with the lid tightly closed. Open containers can accumulate dust, lose moisture, form a surface skin, or become contaminated. Use clean dispensing tools, do not return contaminated paste to the original container, and rotate stock using first-in, first-out practice. Good Housekeeping
Shelf-Life Control Use within the manufacturer’s stated shelf life and verify the lot or expiration information before production. Ageing can change viscosity, expansion, adhesion, color, and curing behavior even when the paste appears acceptable. Quarantine expired or suspect material until it has passed documented print and performance testing. Verify Before Use
Personal Protective Equipment Typical controls include protective gloves, safety glasses, suitable work clothing, and closed footwear. Protection reduces exposure to splashes, stains, cleaning chemicals, and uncured paste. Select glove and eye protection based on the current safety data sheet and the cleaning chemicals being used. Wear PPE
Ventilation and Heating Provide effective local or general ventilation, especially during heat curing and when using cleaning chemicals. Heating can release vapors or decomposition products, while poor ventilation may increase worker exposure. Keep operators away from curing exhaust. Do not rely on odor as a measure of safe exposure. Ventilate Properly
Fire and Heat Precautions Keep paste, packaging, and contaminated wipes away from ignition sources and uncontrolled heat. Combustibility and fire behavior vary by formulation, solids content, and associated solvents or cleaners. Review the safety data sheet, maintain clear access to fire equipment, and never heat a sealed container. Follow SDS Controls
Spill Response Prevent the material from entering drains, soil, or surface water. Spills can create slip hazards and may introduce polymers, pigments, or additives into wastewater. Restrict access, wear appropriate PPE, contain the spill, collect it with compatible absorbent, and dispose of it according to local requirements. Contain Immediately
Screen and Tool Cleaning Clean before the paste dries or cures; use only the cleaning method recommended for the formulation. Dried or partially cured paste is more difficult to remove and can permanently block mesh openings. Use suitable ventilation and PPE for cleaners. Collect wastewater and residues in accordance with local environmental rules. Clean Promptly
Curing Verification Verify the actual ink-film temperature and dwell time rather than relying only on conveyor-belt settings. Oven air temperature may differ from the temperature reached by the printed film, fabric, and foam layer. Use temperature measurement equipment where possible, then confirm adhesion, wash durability, expansion, and surface integrity. Measure and Test
Quality Acceptance Checks Inspect foam height, coverage, edge definition, adhesion, flexibility, wash durability, and appearance. Foam can look acceptable immediately after printing but fail after laundering, stretching, or repeated abrasion. Define acceptance criteria before production and retain a cured reference sample from each approved process. Document Results
Safety Documentation Maintain the current technical data sheet and safety data sheet in the work area or digital document system. Hazard classification, first-aid measures, storage limits, disposal instructions, and required PPE are formulation-specific. Train operators on the latest documents and review them whenever the formulation, supplier instructions, or process changes. SDS Is Authoritative

Note: Temperature ranges and handling practices are general industry guidance. Always follow the current product label, technical data sheet, safety data sheet, workplace risk assessment, and applicable local regulations.

No products in the cart.